前言
.Net 预置的控件已经不能满足日益多样的功能、操作、界面需求。
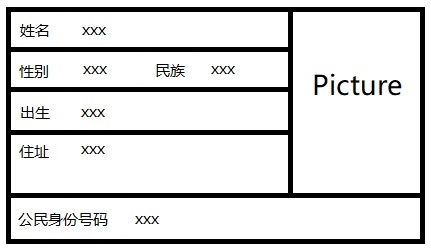
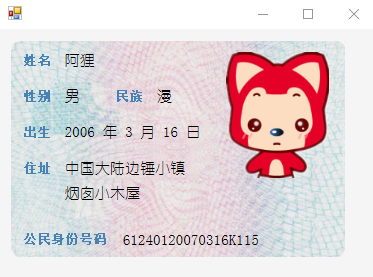
下面制作一个 “身份证控件” 为例。先画一个草图,控件大概就长这个样子:
一,visual studio 里右键项目或者目录,添加 -> 用户控件。
没有 “用户控件” 的话,可以在 “新建项” 里找到。
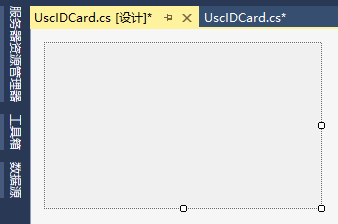
然后 vs 会帮我们准备好必要的文件,并且弹出一个新的 [设计] 工作簿。
如果把开发用户控件比喻为绘画的话,里面的灰白色区域就是画板,怎么画,就看各位的生花妙笔了。
二,给控件添加属性
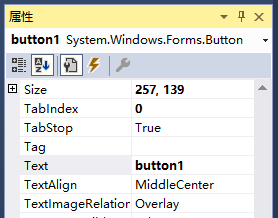
以预置的 Button 控件为例,在使用控件的时候,我们可以编辑他的属性,比如 Text、Size 等:
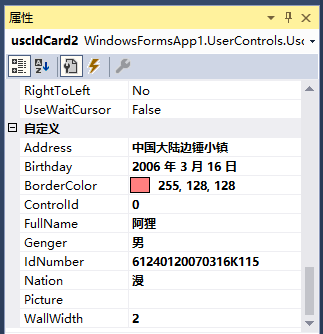
在自定义控件的时候,我们可以添加这样的自定义属性,做法就是在代码中声明。下面,给此次要制作的控件添加几个属性,比如控制 Id,当作控件的主键,还有身份证必须的内容姓名、性别、住址等:
public partial class UscIdCard : UserControl
{
    #region 定义属性

    //控制Id
    private string _controlId;

    [Description("控制Id"), Category("自定义")]
    public string ControlId
    {
        get { return _controlId; }
        set
        {
            _controlId = value;
            Refresh();
        }
    }

    //边框颜色
    private Color _borderColor = Color.LightSeaGreen;

    [Description("边框颜色"), Category("自定义")]
    public Color BorderColor
    {
        get { return _borderColor; }
        set
        {
            _borderColor = value;
            Refresh();
        }
    }

    //边框宽度
    private int _wallWidth = 2;

    [Description("边框宽度"), Category("自定义")]
    public int WallWidth
    {
        get { return _wallWidth; }
        set
        {
            if (value <= 0) return;
            _wallWidth = value;
            Refresh();
        }
    }

    //姓名
    private string _fullName;

    [Description("姓名"), Category("自定义")]
    public string FullName
    {
        get { return _fullName; }
        set
        {
            _fullName = value;
            Refresh();
        }
    }

    //性别
    private Genger _genger;

    [Description("性别"), Category("自定义")]
    public Genger Genger
    {
        get { return _genger; }
        set
        {
            _genger = value;
            Refresh();
        }
    }

    //民族
    private string _nation;

    [Description("民族"), Category("自定义")]
    public string Nation
    {
        get { return _nation; }
        set
        {
            _nation = value;
            Refresh();
        }
    }

    //生日
    private string _birthday;

    [Description("生日"), Category("自定义")]
    public string Birthday
    {
        get { return _birthday; }
        set
        {
            _birthday = value;
            Refresh();
        }
    }

    //住址
    private string _address;

    [Description("住址"), Category("自定义")]
    public string Address
    {
        get { return _address; }
        set
        {
            _address = value;
            Refresh();
        }
    }

    //身份证号
    private string _id;

    [Description("身份证号"), Category("自定义")]
    public string ID
    {
        get { return _id; }
        set
        {
            _id = value;
            Refresh();
        }
    }

    //照片路径
    private string _picture;

    [Description("照片路径"), Category("自定义")]
    public string Picture
    {
        get { return _picture; }
        set
        {
            _picture = value;
            Refresh();
        }
    }

    #endregion

    public UscIdCard()
    {
        InitializeComponent();
        SetStyle(ControlStyles.AllPaintingInWmPaint, true);
        SetStyle(ControlStyles.DoubleBuffer, true); //使能双缓冲,避免刷新闪烁
        SetStyle(ControlStyles.ResizeRedraw, true); //使能尺寸自动刷新
        SetStyle(ControlStyles.Selectable, true);
        SetStyle(ControlStyles.SupportsTransparentBackColor, true);
        SetStyle(ControlStyles.UserPaint, true);
        AutoScaleMode = System.Windows.Forms.AutoScaleMode.None;
    }
}

///
/// 性别 枚举
///
public enum Genger
{
    男 = 0,
    女 = 1
}
添加完这些属性,就能在设计器里看到了:
三,绘图
通过重写基类 UserControl 的 OnPaint 方法绘制控件的界面。
边框、网格,标签,都要 “代码” 画上去,按照草图,规划好长宽比例,文字位置、大小、颜色等。
代码如下:
//绘图
protected override void OnPaint(PaintEventArgs e)
{
    base.OnPaint(e);
    var g = e.Graphics;

    float baseHeight = Convert.ToSingle(Height / 6);
    float baseWidth = Convert.ToSingle(Width / 8);

    //添加背景纹理
    string path = @"D:\backimage.png";
    Image imgSrc = Image.FromFile(path);
    g.DrawImage(imgSrc, new Rectangle(0, 0, this.Width, this.Height));

    //画边框
    //g.FillRectangle(new SolidBrush(_borderColor), 0, 0, Width, _wallWidth);//上
    //g.FillRectangle(new SolidBrush(_borderColor), 0, _wallWidth, _wallWidth, Height - 2 * _wallWidth);//左
    //g.FillRectangle(new SolidBrush(_borderColor), 0, Height - _wallWidth, Width, Height - _wallWidth);//下
    //g.FillRectangle(new SolidBrush(_borderColor), Width - _wallWidth, 0, Width, Height - _wallWidth);//右

    ////画分割线
    //g.FillRectangle(new SolidBrush(_borderColor), 0, baseHeight, baseWidth * 5, _wallWidth);
    //g.FillRectangle(new SolidBrush(_borderColor), 0, baseHeight * 2, baseWidth * 5, _wallWidth);
    //g.FillRectangle(new SolidBrush(_borderColor), 0, baseHeight * 3, baseWidth * 5, _wallWidth);
    //g.FillRectangle(new SolidBrush(_borderColor), 0, baseHeight * 5, Width, _wallWidth);
    //g.FillRectangle(new SolidBrush(_borderColor), baseWidth * 5, 0, _wallWidth, baseHeight * 5);

    //标签字体
    Font font = new Font("Arial", baseHeight / 4, FontStyle.Bold);
    //SizeF textSize = e.Graphics.MeasureString("双字", font);

    //名字 标签
    g.DrawString("姓名", font, new SolidBrush(Color.SteelBlue), baseWidth / 4, baseHeight / 3 + 1);
    //性别 标签
    g.DrawString("性别", font, new SolidBrush(Color.SteelBlue), baseWidth / 4, baseHeight + baseHeight / 3 + 1);
    //民族 标签
    g.DrawString("民族", font, new SolidBrush(Color.SteelBlue), baseWidth * 2 + baseWidth / 2, baseHeight + baseHeight / 3 + 1);
    //出生 标签
    g.DrawString("出生", font, new SolidBrush(Color.SteelBlue), baseWidth / 4, baseHeight * 2 + baseHeight / 3 + 1);
    //住址 标签
    g.DrawString("住址", font, new SolidBrush(Color.SteelBlue), baseWidth / 4, baseHeight * 3 + baseHeight / 3 + 1);
    //公民身份号码 标签
    g.DrawString("公民身份号码", font, new SolidBrush(Color.SteelBlue), baseWidth / 4, baseHeight * 5 + baseHeight / 3);

    //信息字体
    font = new Font("幼圆", baseHeight / 4 + 2, FontStyle.Regular);

    //名字
    g.DrawString(_fullName, font, new SolidBrush(Color.Black), baseWidth / 4 + baseWidth, baseHeight / 3 - 1);
    //性别
    g.DrawString(_genger.ToString(), font, new SolidBrush(Color.Black), baseWidth / 4 + baseWidth, baseHeight + baseHeight / 3 - 1);
    //民族
    g.DrawString(_nation, font, new SolidBrush(Color.Black), baseWidth * 3 + baseWidth / 2, baseHeight + baseHeight / 3 - 1);
    //出生
    g.DrawString(_birthday, font, new SolidBrush(Color.Black), baseWidth / 4 + baseWidth, baseHeight * 2 + baseHeight / 3 - 1);
    //住址
    string addr1 = _address.Length > 8 ? _address.Substring(0, 8):_address;
    string addr2 = _address.Length > 8 ? _address.Substring(8, _address.Length - 8) : "";
    g.DrawString(addr1.Substring(0,8), font, new SolidBrush(Color.Black), baseWidth / 4 + baseWidth, baseHeight * 3 + baseHeight / 3 - 1);
    g.DrawString(addr2, font, new SolidBrush(Color.Black), baseWidth / 4 + baseWidth, baseHeight * 4);
    //公民身份号码
    g.DrawString(_idNumber, font, new SolidBrush(Color.Black), baseWidth * 3 - baseWidth / 3, baseHeight * 5 + baseHeight / 3 - 1);

    //添加图像
    path = @"D:\ali.png";
    imgSrc = Image.FromFile(path);
    g.DrawImage(imgSrc, new Rectangle((int)baseWidth * 5 + (int)baseWidth / 4, (int)baseHeight / 5, (int)baseWidth * 3 - (int)baseWidth / 2, (int)baseHeight * 3 + (int)baseHeight / 2));
}
部分代码注销掉而没有直接删除,是保留一些绘制的方法,供选择参考。
代码里根据控件的长宽,做了很多比例适应和定位,这样设计的控件可以直接等比例缩放,非常的好用。最终效果如下图所示:
后记
在绘制控件的时候,使用到了Graphics 类里的画笔,能画、方、线,组合出了这个控件。其实控件的界面显示只是一方面,更重要的是控件属性是否符合用户需求,属性赋值是否有健壮的校验,数据是否可以自我维护等。
有了这个 “身份证控件”,后期需要使用的时候直接 add 到窗体里,可以手动修改属性,也可以代码赋值,非常的方便,不需要使用 .Net 预置控件一个一个的拼凑,效率低,重用性差。